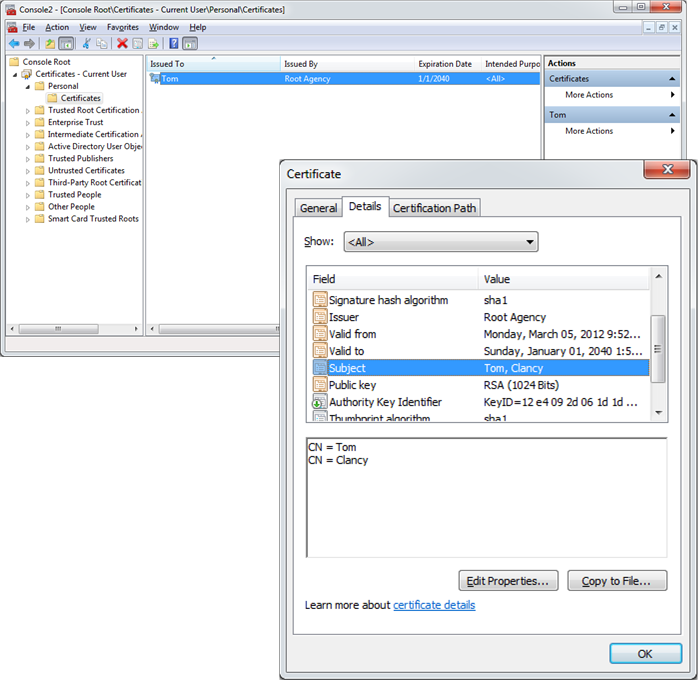
Windows supports several types of certificate stores that are called store locations. You can create a separate store for each Windows service of a machine, and every user has a separate certificate store. Certificates are kept securely in those stores. The local machine store is encrypted with a key managed by the local security authority of the machine. The user’s store is encrypted with a key stored in the user’s profile. Within a store location, Windows separates between stores used for different reasons. The most important stores are:
– Personal store which usually contains all the certificates used by applications and users if it’s a user store
– Trusted Root Certification Authorities which contains certificates of authorities issuing certificates.
If you place a certificate into the Trusted Root Certification Authorities store, you indicate that any certificates issued by this authority are trusted by the system and therefore can be used by any application without any fear. Other certificates by default are not trusted and therefore marked with a special flag.
Note: You should use only valid certificates issued by a trusted authority for critical operations such as authenticating or setting up SSL on the server, because any other certificate could lead to a potential security risk. VeriSign is an example of a well-known authority from which you can buy certificates.
In ASP.NET web application, you should use either the local machine store or a service account’s store. Therefore, the code presented in the articles How to read X509 certificates in C# and How to read X509 certificates in VB.NET, opens the store with the flag StoreLocation.LocalMachine. The second possible flag for this option is StoreLocation.CurrentUser, which opens a current user’s or service account’s store.
You can view the certificates of a store by opening a Microsoft Management Console and then adding the Certificates snap-in, as shown in the next picture. You can open this console by:
1. Starting the management console mmc.exe
2. Selecting File -> Add/Remove Snap In.
3. In the dialog box that appears after selecting this menu entry, you select the Certificates snap-in from the list of available snap-ins and add it to the selected snap-ins list.
4. You should select the store you want to display in the snap-in.
You can create test certificates through the makecert.exe command. For example, the following command creates a certificate in the personal store of the current user.
makecert -ss my -sr CurrentUser -n “CN=Tom, CN=Clancy”
As soon as you have the certificate from the store in place, you can use it when sending requests through SSL to a server that requires certificate authentication, as follows:
C#
// Now create the web request
HttpWebRequest Request = (HttpWebRequest)WebRequest.Create(url);
Request.ClientCertificates.Add(Certificate);
HttpWebResponse Response = (HttpWebResponse)Request.GetResponse();
// …
VB.NET
‘Now create the web request
Dim Request as HttpWebRequest = DirectCast(WebRequest.Create(Url), HttpWebRequest )
Request.ClientCertificates.Add(Certificate)
Dim Response as HttpWebResponse = DirectCast(Request.GetResponse(), HttpWebResponse )
‘…
For the preceding code, you need to import the System.Net namespace in your code file. Useful cases where this code makes sense are, for example, use cases where your application needs to retrieve data from another web application or send data to another web application using HTTP GET/POST requests and the other web application requires authentication through certificates.

